Applying a fake mustache can be a bit tricky, especially if you want it to look natural and stay securely in place. Here’s a detailed, step-by-step guide on how to apply a fake mustache using adhesive for a seamless, professional look. Follow these instructions carefully to make sure your mustache stays put, even when you’re moving or talking!
Materials Needed
Before you begin, make sure you have the following items ready:
- Fake mustache (preferably lace-backed for a natural look)
- Spirit gum or mustache adhesive (a long-lasting glue that’s safe for skin)
- Cotton swabs or small brush for applying glue
- Adhesive remover for when it’s time to take off the mustache
- Tweezers (optional) for precise adjustments
- Makeup sponge or powder (optional) to blend edges for a natural finish
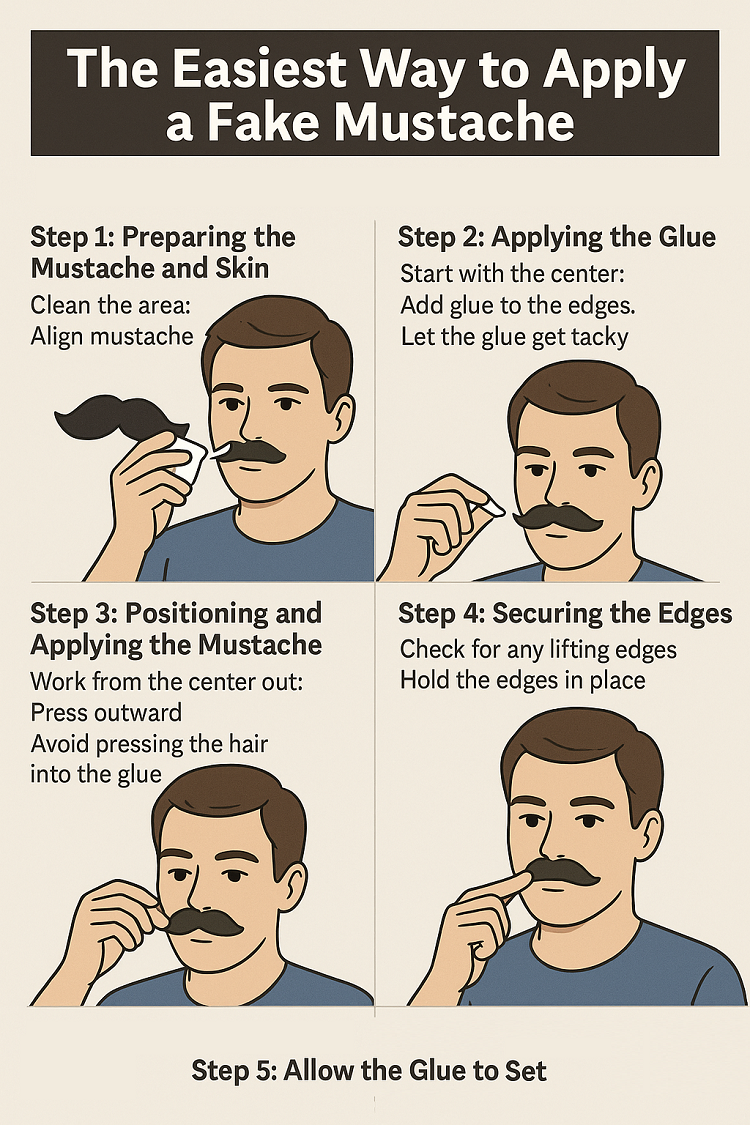
The Easiest Way to Apply a Fake Mustache
Here, you can learn to apply a fake mustache with 5 easy steps.
Step 1: Preparing the Mustache and Skin
- Clean the area: Make sure the area where you’ll be applying the mustache is clean and dry. Oils or makeup can affect the adhesive, so it’s essential to start with a clean surface.
- Align the mustache: Hold the mustache up to your face and check the positioning. Identify the center of the mustache and align it with the center of your upper lip. This step helps ensure an even application.
Step 2: Applying the Glue
- Start with the center: When you’re ready to apply, put a small amount of adhesive under the center part of where the mustache will sit. This part is critical as it helps anchor the mustache securely.
- Add glue to the edges: Apply more glue along both sides of your upper lip. Don’t overdo it; just a small amount on each end should be enough.
- Let the glue get tacky: Wait a few seconds until the glue is tacky. Avoid letting it dry completely, but make sure it’s not too wet, as this will help the mustache adhere better.
Step 3: Positioning and Applying the Mustache
- Work from the center out: Once the glue is tacky, carefully align the center of the mustache with the middle of your upper lip. Press the center down gently to ensure it adheres well.
- Press outward: After securing the center, gradually press down on the edges, moving outward. This approach ensures the mustache sits evenly and reduces the chance of any air bubbles.
- Avoid pressing the hair into the glue: Use your fingers or a small tool to press down on the lace backing of the mustache without touching the hair. This will keep the hair from sticking to the adhesive, allowing it to look more natural.
Step 4: Securing the Edges
- Check for any lifting edges: Examine the edges of the mustache to make sure none are lifting. If you notice any spots that aren’t fully attached, apply a tiny amount of glue underneath and press down.
- Hold the edges in place: For the best hold, press the edges firmly for a few seconds. This will ensure that the mustache stays secure, even if you’re talking or moving your lips frequently.
Step 5: Allow the Glue to Set
- Wait for it to dry: After applying the mustache, avoid moving your lips for a couple of minutes to give the adhesive time to fully set. If you try to move too soon, the mustache might shift or come loose.
- Test for security: Gently move your lips or talk to ensure the mustache stays in place. If it lifts, add a bit more glue where needed.
Additional Tips for a Natural Look
- Blend the edges: If you want an ultra-realistic look, you can apply a small amount of makeup powder around the edges to help the mustache blend with your skin tone.
- Use adhesive remover to take it off: When you’re ready to remove the mustache, apply a safe adhesive remover around the edges and gently peel it off to avoid skin irritation.
Types of Fake Mustaches and How to Choose the Right One
Not all fake mustaches are created equal! Different styles can suit different looks and purposes. Here are some common types:
- Lace-Backed Mustaches: Made with real or synthetic hair, these mustaches are often applied with spirit gum for a natural look. Great for professional use in theater or film.
- Stick-On Mustaches: These have adhesive backing, making them easy to apply and remove without additional glue. They’re ideal for quick costume changes or casual use.
- Synthetic Mustaches: Made from materials like felt or synthetic fibers, these are generally more affordable but may not look as realistic up close.
- Human Hair Mustaches: For a high-quality, natural appearance, human hair mustaches are often used in professional settings and are designed for a more realistic, seamless look.
When choosing a fake mustache, consider the occasion, budget, and how long you need it to stay on. If you’re looking for a realistic look that can withstand movement and even some sweat, a lace-backed mustache applied with adhesive might be your best bet.
Tips for Maintaining a Fake Mustache
A good quality fake mustache can last a long time if taken care of properly. Here are some tips:
- Cleaning: Avoid washing fake mustaches directly. For lace-backed ones, use a bit of adhesive remover to clean the base after use. Stick-on mustaches generally can’t be cleaned, so it’s best to replace them after each use.
- Storage: Keep the mustache in its original packaging or a small plastic bag to prevent dust buildup and tangling. For high-quality mustaches, consider storing them on a small mannequin or holder to keep their shape.
- Handling: Avoid touching the hair as much as possible during application. Oils from your skin can make the hair look greasy and may cause it to wear out faster.
- Reusing the Adhesive: If you’re using spirit gum, remove the old adhesive residue after each use to ensure it maintains a strong bond during future applications.
- Use Beard Butter: Apply a very little amount of a beard butter to keep it moisturized.
Common Mistakes to Avoid When Applying a Fake Mustache
Even with practice, there are some common mistakes that people make when applying fake mustaches. Here’s what to watch out for:
- Using Too Much Adhesive: It’s tempting to go overboard with the glue, but a small amount is often enough. Too much adhesive can be messy and difficult to remove, and it may even damage the mustache.
- Not Waiting for the Adhesive to Become Tacky: Applying a mustache to wet adhesive won’t create a secure hold. Waiting a few seconds after applying the glue allows it to become tacky, which helps it bond better.
- Positioning Mistakes: Always align the mustache carefully before pressing it down, as moving it after application can disrupt the adhesive and create a less natural look.
- Overhandling the Hair: Touching the hair too much can flatten it or make it look unnatural. Try to handle only the lace or backing when positioning and securing the mustache.
Troubleshooting: What to Do if Your Fake Mustache Won’t Stay On
If your mustache starts to lift or won’t stay on, try these quick fixes:
- Reapply Glue to the Lifting Edges: Add a bit more adhesive to any lifting areas, especially near the edges. Press firmly and hold for a few seconds.
- Use a Setting Powder: For long-wear situations, gently apply a setting powder along the edges to absorb any moisture or oil that might be causing the adhesive to weaken.
- Check Skin Preparation: Oily skin can affect adhesive performance. Before application, wipe the area with a gentle toner or alcohol pad to remove oils.
Creative Uses for Fake Mustaches Beyond Costumes
A fake mustache isn’t just for costumes; it can add a fun twist to various situations! Here are a few ideas:
- Themed Events: Mustaches are popular at parties with themes like the Roaring ’20s, Western, or even “Mustache Day.”
- Photography Props: Add a bit of whimsy to photo booths or family photos by using fake mustaches as props.
- Pranks and Disguises: A classic tool for harmless pranks, fake mustaches can be used to create humorous “disguises” or add an element of surprise.
Conclusion
With the right technique and a steady hand, applying a fake mustache can be quick and easy. By following these steps, you’ll ensure that your mustache stays securely in place and looks as realistic as possible. Whether you’re preparing for a costume, performance, or simply a fun disguise, mastering this technique will give you a natural, professional look every time.